Using whole class visual schedules
Jul 06, 2021
Ever since I started working as an Occupational Therapist with children, one of the first tools I was introduced to was a visual schedule. For me, I love a good list and I love being organized so using a visual schedule seemed common sense to me. If knowing what is happening in your day and ticking them off as you go works for adults, then why wouldn’t we use them with children?
In a classroom visual schedules can be a lifesaver. A simple yet effective strategy to bring more calm to your classroom.
A visual schedule is like a picture to-do list or daily schedule used to show an upcoming plan or sequence of events within a desired activity, the day, week, or month. The written steps are usually supported by images, either graphics or real photos. Visual schedules provide a clear way of understanding the process involved in tasks and provide a sense of predictability helping a child to anticipate future events. This predictability and anticipation can allow a child to organise their thoughts and prepare themselves for what is required from them over the day.
They are like looking at your calendar and seeing what meetings you have, any visitors, if you have after school sports commitments. A visual schedule lets you know what is coming up and so a child can prepare themselves and organize themselves.
A visual schedule can assist children further by:
- Reducing reliance on a teacher.
- Providing predictability & structure.
- Assisting transitioning between tasks and activities in the day.
- Learning concepts like first this, then that, or sequences like 1,2,3.
- Encouraging emotional regulation in those children who may feel anxiety with an unexpected change or not knowing what is coming up.
- Helping you to stay on track with what is happening in your day.
Using a visual schedule in a classroom can be a simple yet effective way to plan out your day and set routines for the whole class to follow. They assist the students, and they assist the teacher. They are a win-win.
How to make a whole class visual schedule
Making a visual schedule doesn’t have to be another complicated task to add to your list. They need to be simple to implement and simple to follow. To get started you will need to decide upon what type of images and design you will use. The types of images are;
1. Object: These are the most concrete schedules. For example, a book may indicate that it’s time for reading.
2. Photograph: Photograph schedules take a little longer to set up but still effective. Photographs can be of a person or a location in the school such as the library, or where to go for assembly, or of a specific person.
3. Graphic: Graphic images or drawings are more symbolic so younger students may find it a little harder to generalize however these styles of schedules are very commonly used in whole class schedules and are easy to create.
4. Written: This is the simplest of schedules to implement however the students need to be strong readers. It is recommended to pair an image with the written word.
Programs for images
There is a range of programs available for you to access images to support your visual schedules. Find the style of images that work for you and your class, is age-appropriate, and is easy to access and change if required. Some of the programs available include.
- Boardmaker - https://goboardmaker.com/
- Do2Learn - https://do2learn.com/picturecards/VisualSchedules/index.htm
- LessonPix - https://lessonpix.com/articles/4/52/Picture+Cards
- Canva – www.canva.com
Examples of whole class visual schedules
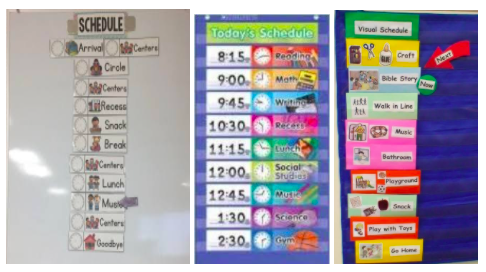
Once you choose the style, it's time to make it.
1. Location. Decide on where you would like to display the schedule in your classroom. Ensure it is in an accessible location and one where it is easy for all students to see. The front of the class next to the board usually works best.
2. Size. Decide on the best size of the schedule and mark it out using a ruler so that when you go to the next step you are ready to design the schedule to match the space you will be displaying it.
3. Create. Use a document creation program such as Microsoft Word or a design program like Canva.com or any of the programs listed above and set out the size you want the schedule to be and access the images you are using. Make as many images and steps as you may need over the course of the year. The design stage can be a little time-consuming so you want to minimize having to go back and make them again during the year.
4. Print. Once you are happy with the design print the schedule in colour. Colour makes the schedule more appealing and will help the schedule stand out.
5. Laminate. Laminate each of the steps so that you only need to make the schedule once and you can use it over and over again. You will be changing it daily so laminating it will help it stand the wear and tear.
6. Display. Velcro is a commonly used form of adhesion used to stick the schedule to the wall. Blue tac is another easy-to-use medium to minimize any marking of the wall.
7. Set up. Once the visual schedule has been made it’s time to put it in place. Put the spare images in a box or a folder so it is easy to find the images you need. Using a whole class visual schedule should take only 1 minute each morning to set up so make the process as simple as possible.
Visual schedules will make your day run smoothly. Enjoy!
Angela
Author